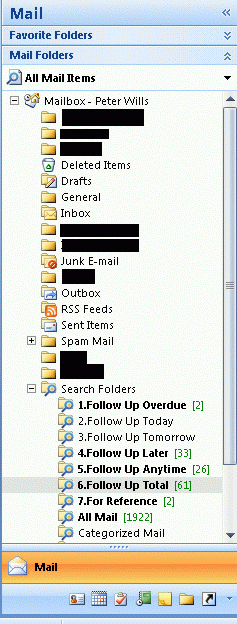
 The following information is based on my own experiences using computers personally since I purchased my first system in the mid 1970's and using them daily in a work environment since the mid 1980's. I do not have any formal computer qualifications and rely on my extensive practical experience which is often the best teacher. The information presented here is basic at best and is intended only as a general guide to inform and assist. There are many sources of information on the Internet which can be found by a Google search. Future updates to this site may contain more detailed information however this is something which will happen over time. If you are having trouble with your version of Windows or there are settings or issues which you would like to change, one of the most useful and complete reference sites for Windows issues and problems can be found at http://www.annoyances.org. If you would like an opinion or further information on any matters you may email me and I will endeavour to assist. Keyboard Shortcuts Learning keyboard shortcuts for common Windows tasks can save time and make the overall computer experience more enjoyable. Many programs also allow for the use of specific keyboard shortcuts to carry our certain functions of the program. There are many useful guides available on the Internet as a Google search will show. You can also follow the links on my home page to sites which list various useful software utilities. Desktop Shortcuts These are another useful time saver that allow the execution of programs or tasks by clicking on a desktop icon. Some programs will place a shortcut icon on the desktop as part of the program installation process. Some programs will ask you if you want this to occur and some won't. Starting a program this way is quicker than wading through programs listings using the Start button to find the program you want to start. You can also create your own desktop icons to any program. The easiest way to do this is to locate the file that runs the program you want to use. The filename should have an exe extension after the dot in its name. Right click on the filename then click on Send To then click Desktop (create shortcut). Windows also allows a shortcut key sequence to be set up for any desktop or start menu item including desktop shortcuts. Too many desktop icons? This can slow down desktop loading times at start up particularly if you have large files saved directly to your desktop. It can also cause slow screen refresh times when you switch back to your desktop from an open application. Ideally the desktop should only contain shortcuts to actual files/folders rather than actual files and folders. Having files of any significant size saved on the desktop will slow down the loading of the desktop on startup of your system. Even if your desktop does only contain shortcuts and system placed icons (My Computer, My Documents, My Network Places etc) if you have most or a large proportion of your desktop screen full of icons it can slow down your desktop refresh times unless your computer has sufficient RAM and a separate graphics card. Desktop clutter makes it harder to locate specific shortcuts. An alternative is to create a few holders on your desktop and move shortcut icons into an appropriate folder. For example you may have a folder called Work, one called Personal, one called Programs etc. When a new desktop shortcut is created either manually or by a program installation, drag it into an appropriate folder or create a new folder but try not to have too many folders either. A good number is between 5 and 10 as most program or file shortcuts should then be able to be allocated to a suitable folder. You can also have folders within folders. Whichever way you do it files and folders located on your desktop should only be shortcuts to the actual file or folder which resides in another location on your hard drive. Cutting, Copying & Pasting This is a feature of Windows that every user should become familiar with as it can again be a huge time saver. The only drawback is the limitation of the Windows clipboard which stores information that has been cut or copied from an application before it is pasted to where you want it to go. The limitation is that you can only store one cut or copy operation at a time. If you cut or copy information from one source then cut or copy information from another source the clipboard will only store information from the last cut or copy operation. There are some very useful freeware utilities available which allow you to store information from multiple cut or copy operations before pasting that information to a destination. Also some programs have their own albeit limited built-in facility that effectively allows the storage of information from more than one cut or copy operation. A cut operation actually removes the information from the source area whereas a copy operation leaves the original information intact. Stop Text/Images Scrolling on a Web Page Do you ever get sick of visiting web sites with scrolling text or images and wish you could stop the scrolling to read what the text says or see the image whilst it is not moving? Whilst you cannot stop the scrolling completely you can temporarily pause all scrolling on most web pages by left clicking and holding the mouse button down on either the minimise, maximise or close button at the top right corner of your browser window and moving the cursor away from the window button to any other blank part of the browser window while still holding the mouse button down. As soon as you release the mouse button the scrolling will continue. If you leave the cursor positioned over the browser window button when you release the mouse button the normal consequence of that action will occur i.e. the window will be minimised, maximised or closed. Try this by following the above procedure and watch the bar below to see if scrolling stops. Remember to move the mouse off the window button you clicked before you release the left mouse button. If the scrolling text on a web page is contained within a box it may be possible to pause the scrolling by simply placing the cursor inside the box and/or clicking and holding down the left mouse button however this depends on whether the web page author has programmed this capability into the page. In some cases this may be the only way to stop the scrolling. Task Manager The Windows Task Manager is a very useful utility which should be run to monitor your computer's use of memory and CPU resources. It also provides a list of processes currently running on your system. When Windows is started it loads a number of system processes or programs which are essential for your computer to operate and do what you want it to do. It can be opened by pressing the Ctrl Alt and Delete keys together and can be set to start when Windows starts by placing a shortcut in your start up folder. It is a very good idea to get to know what these processes are or at least know the ones that are normally running when Windows has started and you have loaded the program(s) you want to run. This way, if you see any odd entries here it can alert you to something that is running or has started without your knowledge that may be harmful to your computer such as a virus or spyware. Sometimes though, such malware may not even show up in the Task Manager list. The Task Manager is also the first place to look if your computer seems to be running slower than usual or is doing strange things. Such symptoms can but not always indicate the presence of a virus or other malware on your system. See below under "Slow Computer" for more information. There is also an advanced Task Manager utility called Process Explorer which can be downloaded here. It can be set to replace the Windows Task Manager when you press Ctrl+Alt+Delete or just simply ran instead of it. It provides a great deal more information than the Windows Task Manager. However, as with any advanced Windows utilities great care should be taken in their use and they should only be used by users with at least an intermediate level of understanding of computers and the Windows operating system and always at your own risk. Slow computer? If your computer seems to be taking ages to do a certain task it could be due to a number of reasons. As lots of Windows processes and open applications compete for use of your computer's resources the end result can be that your system can become bogged down by a misbehaving application that is hogging your computer's processor or memory or your system is just simply overworked and does not have the memory and/or processing capacity to handle the tasks being asked of it. The easiest way to monitor this, and you should as it can be compared to ensuring that your car has enough petrol in the tank to get you where you are going, is to have the Windows Task Manager running in the system tray. It presents as a vertical green rectangle and by default shows the extent of CPU usage at any given time. High CPU usage is indicated by the rectangle being bright green. The more of the icon that is bright green the higher the CPU usage. Dark green indicates little CPU usage. High CPU usage is one thing that can slow down your system drastically. Double clicking on the icon will open the Task Manager window which will show you which processes/applications are using the CPU the most. Click on the CPU column header where it says "cpu" to order the list so you can see which processes are using the most. Click on the column header a second time to order the list from high to low. Monitoring this icon over a period of time will give you a picture of what processes or programs may be causing your system to run slowly. It will also familiarise you with those processes that are normally running when you are using your computer and may help pinpoint a rogue application or process that may be running. If you are unsure about a particular process then do a Google search on it. A reliable site for information on windows processes and applications is www.liutilities.com/products/wintaskspro/processlibrary/ Overheating will also slow down your computer drastically. This is especially so with laptops. The build up of dust and dirt inside the confined internal space of a laptop will significantly reduce the fans cooling ability. Eventually the laptop will switch itself off when the internal temperature becomes too high. After I recently cleaned dust and dirt out of the inside of my daughter's laptop which had been turning itself off due to overheating it ran cooler by nearly 20 degrees centigrade and has now stopped turning itself off. It also runs noticeably faster. The same applies to desktop systems although they are not as prone to dust and heat problems as laptops. A regular (at least annually) internal clean out will help keep your computer in good running order. This can be done yourself however it is not recommended unless you are handy with mechanical/electronic devices and certainly not if your computer is still under warranty. Any reputable local computer shop or even some TV repair services can easily handle this task for a moderate price. There are advanced utilities available which provide much more information that the standard Windows Task Manager. One of these is Process Manager. The use of any third party and/or advanced utilities for your computer is only recommended to users whose computer knowledge and expertise is at least at an intermediate level and is always at ones own risk. Memory Of course other things such as memory play their part in determining how a system runs. If you use your computer mainly for surfing the Internet, occasional email, writing the odd letter and maybe keeping your home budget on then you can probably get by with 256MB of RAM. If you are running Windows XP then 256MB of RAM should be regarded as the absolute minimum memory requirement even though Microsoft's own minimum specifications is 64MB! I have seen XP systems with 128MB of memory that are all but unusable. If, however, you use your computer for business purposes or for more intensive Internet purposes such as maintaining a web site, digital photography, online gaming, downloading large files and it is running Windows XP then ideally you should have no less than 512MB of RAM and a separate graphics card so that memory required to run your monitor display is not drawn entirely from system memory. 1GB of memory would be even better. Even when you have closed a program that you have been using, all the memory that was being used by that program may not be immediately released for use by other applications and some of it may not be released until you restart your computer. Having to restart your computer just to free up memory can be a real pain in the proverbial! With many programs memory use is greater when you are actually using the program. If you have a program open but are not actively using it some memory may actually be released. Simply monitoring the Task Manager's Memory usage column will often show this. There is a proliferation of memory management utilities available which purport to either release or defrag memory or both. The bottom line from my experience and from numerous independent analyses on the Internet is that if your system is running Windows XP then they are a waste of time. The best memory management strategy is to ensure your system has sufficient physical memory for your intended/actual use. In this regard you should also be aware that in many basic or standard systems without a separate graphics card the memory required to run the display monitor is drawn entirely from system memory which then leaves less memory available to run the operating system and applications. The better option and it is not at all expensive is to have a separate graphics card in your computer which provides the memory to run the display and leaves most of your system memory available to run the operating system and applications. Notwithstanding the above comments regarding memory management utilities there is another strategy you can employ to manage memory yourself and this does not involve tweaking of Windows own memory management settings. Another plus is that it can be done at no cost. Some programs can be minimised to the system tray when not being used by an option setting within the program. Programs minimised to the system tray generally use less memory than when they are not minimised. However there are many programs that do not have this option built in to the program. There are programs available on the Internet, some free and some available at a cost, that allow you to minimise any application to the system tray. The advantage of this is that many program's memory usage will drop dramatically when minimised to the system tray even if the program was not being actively used but was simply open. I have proven this in my daily work and use this strategy to effectively manage my system's memory allocation and usage with little user input. The most effective program I have found to do this is 4t Tray Minimiser Free. Whilst I certainly have not tried all available tray minimising utilities this one does the job for me so I stopped looking when I found and tested it as it enables me to effectively manage my system's available memory simply by minimising applications to the system tray. It uses little or no discernible CPU power and has significant negative memory usage as the memory it uses is considerably more than offset by memory returned from minimised applications. Even some applications which have their own built-in setting to minimise to the system tray benefit by using 4t's minimising function instead of the built-in setting as the memory returned to the system is greater when the application is minimised using 4t. However, the better option is always to have sufficient memory installed rather than rely on memory management utilities. With such utilities it can also be the case that what works for one user may not necessarily work for another user due to differences in their computer systems, installed programs and the general health of their system. There are, however, some programs which may not work well when used this way. I have found that Excel is one of these. Another is the Mozilla Firefox web browser which does not release any memory. For advanced users there is a tweak which can be made to Firefox's config file which does free up memory when Firefox is minimised in the normal manner. This applies generally to Firefox versions 2 and earlier. Firefox 2 had a particularly voracious appetite for memory. Firefox version 3 addressed this issue to a large extent and is much leaner in the use of memory than version 2 however intensive browsing will still push the memory footprint up and this generally applies to most browsers. Another memory hog can be your web browser which accumulates a lot of information in its cache as you surf the Internet. This includes details of web pages you visit so that when you re-visit those sites much of the information can be reloaded from your browser's cache which is quicker than reloading the site from the Internet. However be aware that information on the site may have changed since your last visit. To ensure that the page displays the most recent information you should click on the reload or refresh button on your browser's toolbar. This somewhat negates the advantage of reloading a page quickly from the cache. As the cache grows in size this may actually slow down your system as the browser uses more memory to store information in the cache and more CPU power. You can of course limit the size of the cache in your browser's settings. Your browser will also have settings that allow you to clear the cache on a predetermined basis e.g. at startup or exit or by manually clicking a "clear now" button in the settings. To check the memory usage by your browser, open your web browser then open Task Manager and click on the Memory Usage column. Click on the Memory Usage column a second time to order the column from high to low. Now note how much memory your browser is using. Then use your browser to do some intensive web surfing for say half an hour to an hour and re-check the memory being used by the browser. You may be surprised! This can sometimes be brought back to an acceptable level by clearing your browser's cache via the options menu in your browser. The sure fire way is to completely exit your browser and restart it. Despite all of the above, if your system is thin on memory you will still eventually experience memory related issues if you tend to have a number of programs open at the same time e.g. Excel, Word, a web browser, an email client. At the end of the day the most effective memory management strategy is to ensure that your system has more memory than you need or simply install the maximum memory that your computer's motherboard and chipset is designed to take. This is a relatively inexpensive option for the performance gain that can be achieved. Unfortunately this will not be a solution for all users as some may be using an older system that has limited upgrade capabilities in terms of additional memory that can be installed. If this is the case and you are trying to run up to date programs and applications and your system is still slow even with the maximum amount of memory installed then it may be time for a new computer! Essential Utilities There are a number of utilities which should be run to ensure your computer is as safe as it can be from viruses, trojans, spyware, adware and any other form of malware that might be lurking on the Internet or in email attachments or, indeed, in any files or data from external sources that is loaded onto your system. With the extent of Internet usage and exposure at the level it is now and which will no doubt grow exponentially in the future there is so much more risk to being online than ever before. However, in saying that there are steps that a user can and must take to minimise these threats as much as possible. There is no point in adopting a head in the sand approach and thinking that it will not happen to me or that it is all too hard and you will learn to live without the Internet. This is unrealistic as it is already an integral part of most of our lives whether it be at work, school, college or home and this will only increase in leaps and bounds. The Internet is already being talked about as a threat to free and pay TV services through streaming audio and video directly from the Internet into home entertainment systems and the consortiums of content providers that are already being formed to advance the network infrastructure required to service these facilities and technologies is further proof of this. From a computer security point of view the minimum any system should have in order to provide adequate protection from malware is a decent firewall, anti virus software, adware detection and removal software and spyware detection and removal software and these should be run often and constantly updated. Many such programs allow this process to be set to automatically occur at preset intervals/times. Useful Free Programs A very useful program to have on any system is Irfanview. It is an image viewer and editor with extensive capabilities. However a very practical use is to save/view a screen dump (a picture view of what is displayed on your computer screen). Hitting the Print Screen key will copy an image of your screen to the clipboard. You can then paste this into Irfanview and save it as a jpg or gif file. This can be useful for instance if you want to capture and save error messages or views of screens in particular programs. Keep in mind though that the Print Screen key will only capture what is displayed on the screen. If text or images extend beyond the edges of the screen this will not be captured. Future updates will list and link to the programs that I use on a regular basis. In the meantime please check out this link. Windows Vista/XP The release of the new Windows Vista operating system promised to be bigger and better than anything seen before. However, with this comes the need to have a computer system that is powerful enough to run the operating system as well as installed programs and applications. The majority of Windows XP systems currently used by average users will more than likely have nowhere near the capability to run Vista and some may not even be able to be upgraded sufficiently to do so depending on current hardware components installed, in particular the motherboard, processor and graphics card. Vista will require significant hard drive space, memory and a reasonably powerful graphics card just to handle routine tasks such as word processing, number crunching and web surfing. If powerful graphics and CAD applications are going to be run then considerably more powerful systems will be required. There have also been reports of compatibility problems between Vista and existing software as well as some hardware such as printers and scanners. The first service pack release for Vista (SP1) has been released and this should address some of the issues that have been reported. Whilst it has been reported that many users and computer professionsals want XP to continue to be available it will apparently not be available to the general public after 30 June 2008 although it will continue to be supported by Microsoft into 2009. Some computer vendors may still be able to supply XP based systems after this date although this is not certain. One of the biggest bugbears users have had with Vista is the User Account Control feature which will continually pop up dialog boxes requiring the user to click on a Continue button to proceed to carry out a procedure. It is meant to be a sort of safety feature to help prevent the execution of a task or procedure that potentially may cause problems such as the running of a downloaded program that may be of a malicious nature. An excellent Vista tweaking tool has recently been released and is available here. This enables a user to easily make changes to how Vista works and is based largely on Microsoft's own TweakUI tool which only works for Windows XP. Whilst most if not all the tweaks the Vista tool provides can be done manually through either Windows own settings or Registry editing the tool brings them together in one excellent interface where users simply need to check or uncheck boxes for the various tweaks. However, as always, the end responsibility is on the user and programs such as these which make it easy to change Windows settings and behaviours are best used by experienced computer users who know what they are doing.Microsoft Outlook 2007 I have recently been re-introduced to Outlook in the course of carrying out some consulting and contracting work. I had last used Outlook in a work environment several years ago and whilst it has long been the benchmark by which corporate email and task management systems are judged I had never previously taken advantage of its many advanced features as I saw it as being too prone to hackers,spam and virus attacks. This has largely changed with better spam and virus handling filters built into Windows operating systems and software as well as much improved filtering at the ISP level even before email reaches your Inbox. That is not to say that such threats are a thing of the past. They are not. It is just that the user is now better protected even without any direct user intervention or action. Having recently been exposed to the latest version of Outlook (2007) I made a deliberate effort to get up to speed with the latest changes and some of the advanced features which have either been newly added or enhanced over time. For anyone in a work situation where Outlook is the standard email and task management tool and who handle a lot of emails on a daily or weekly basis it is well worth taking advantage of its sophisticated features to make your work life that much easier. Many people live in Outlook and record all manner of tasks, notes and activities using its advanced features. Some people may say that this is more easily done by using a day book or work diary and that is true up to a point.However where Outlook and other computer based management tools shine is in the ability to quickly retrieve that email, note, task or appointment that you remember from some time ago but cannot find in your paper system. Whilst you may eventually find it thumbing through your day book or diary Outlook will find it for you in seconds. Not only that but Outlook can produce extremely useful summaries of all data collected, something that a manual system cannot duplicate without many tedious hours of summarising. Briefly, Outlook allows you to manage, categorise, record and document emails, notes, contacts, tasks and calendar entries in a myriad of ways. There is so much functionality built into Outlook that it is hard to envisage any user utilising Outlook to its full potential. However, on to the management of your emails and tasks using Outlook. The methodology outlined below works in Outlook 2007 however it has not been tested in Outlook 2003 or 2000. Some of the Outlook features used in the system outlined above were not available in Outlook 2000 and may not have been available in Outlook 2003. All emails coming into Outlook arrive in your Inbox. This should be simply a temporary holding place for emails. The idea is to end up with an empty Inbox. There will still be emails requiring action or that you will want to refer to in future and the process of tracking these is outlined below. With the volume of emails circulating in cyberspace these days it is easy to become bogged down in a sea of information. Some of the email we receive will be useless information which should be immediately deleted however much of it will be important work related or even personal information which we either need to act on or may want to retain for reference. Management experts suggest that the best way to deal with email is to set aside half an hour to an hour first thing in the morning and last thing of an afternoon or in the last hour of your work day to review your Inbox. Of course that is an ideal that in reality is probably not attained or even attainable for that matter. There will always be times during the course of a day where an email arrives that you have been waiting on in order to complete a task or it may be a request from a contact that does require an immediate response. These are real life scenarios and need to be provided for in any email/task management strategy. The point is that if you have an organised email and task management system it is far easier to slot in these "interruptions" with minimal disturbance to your routine as you can see exactly where you are up to and can make an informed decision as to how to handle such events. Getting back to your email review periods, once you have reviewed new mail in your Inbox it should then be dealt with by determining:-
Emails that require an action are then handled by implementing one of the following actions known as the 4 D's of email management.
New folders should be kept to a minimum (say no more than 10 new folders in addition to the default ones already there) representing broad categories (See Step 1. below) and if necessary sub folders then created under a relevant main folder. Following is a summary of the built in Outlook tools and features that will be used to set up an effective Outlook email and task management strategy. Outlook Tools & Features Rules and Alerts Outlook allows for a myriad of rules and alerts to be set up to automatically handle incoming and outgoing emails. This will be looked at in detail another time. The only new rule I would create first up is a Send Delay Rule which will place any outgoing email into the Outbox for a preset period of time (from 1 minute up). When the preset time has expired Outlook will automatically send the email and it will disappear from the Outbox and be filed in the Sent folder. The beauty of this is that if you ever hit the Send button then realise you did not attach the file that should have gone with the email or you left something out or simply want to change something then you can go to the Outbox before the delay time has expired, open the email and correct the problem. While you have the email open in the Outbox it will not be sent until you complete your changes and hit the Send button again. A new delay period will then commence before the email is sent. Follow Up Search Folders These are the key to successfully handling and managing your email workflow. Outlook has a built in Follow Up Search Folder which is normally set up by default. If it is it will be either in the Search Folders section at the bottom of your Mail pane in the Navigation panel or in the Favorite Folders section at the top of your Mail Navigation pane. As this is a default Outlook folder it can be renamed but cannot be customised to change criteria which need to be set up to tell Outlook what to display in the folder. That is ok for this folder as we want it to show all emails which have been allocated a follow up flag. Outlook also allows you to set up Custom Search Folders. I have the following Follow Up Search Folders set up in Outlook. 1.Follow Up Overdue 2.Follow Up Today 3.Follow Up Tomorrow 4.Follow Up Later 5.Follow Up Anytime 6.Follow Up Total 7.For Reference 8.Delegated The numbers preceding the names actually form part of the name and are used in this way in order to display these folders at the top of the Search Folders folder in your Mail Navigation panel. The first folder is much like your Inbox and should not really have any emails stored in it. It is simply there as a trigger to capture any emails that have slipped through the system and not been handled before becoming overdue. These should be the first items looked at in your daily email review and either a new date set or some other action applied to them that will take them out of the Overdue folder. Folders 1. to 5. are Custom folders which have criteria set to tell Outlook what emails to display in them. Folder 6. mimics the Outlook default Follow Up folder except that it allows criteria to be entered whereas the default Outlook folder does not. It simply records the total of all messages which have been allocated a Follow Up flag. The benefit of having this folder is that it displays the total of all emails referenced for follow up at any time which then serves as a cross check that the total of messages displayed in folders 1. to 5. is correct. Folder 7. is the Reference folder which will accumulate messages categorised as For Reference. Messages in this folder are not included in the total as it is for messages which contain important information which may need to be referred to on a daily or regular basis and which have not had a Follow Up flag applied to them. Emails shown in this folder are categorised by name and color. If you are in a situation where you have employees who you can delegate certain tasks to a further folder can be added and that can be called "8.Delegated." Messages that you want to reference in this way are Categorised as Delegated. You can and should also apply a Follow Up flag to these messages. If a Follow Up flag is applied the message will also be included in one of the Follow Up folders 1. to 6. depending on the Follow Up flag applied. If no follow up date is needed the Follow Up flag should be set to No Date. Messages allocated a No Date Follow Up flag will appear in the Follow Up Anytime folder. At the start of each day it is good idea to click on each of these folders to ensure any changes to due dates assigned to emails are properly reflected and also to ensure that the change from one day to the next has also been correctly adjusted for. Then quickly check that the total of messages in folders 1 to 5 tally with the total of messages in folder 6. Categories Categories are a useful way to highlight certain messages and can be used in conjunction with Rules and Alerts to provide powerful filtering and mail handling options in Outlook. However the main purpose here is to highlight simple and effective mechanisms to manage tasks and emails. The use of Categories has therefore been limited to the use in relation to the "For Reference" and "Delegated" folders. Outlook Journal Outlook's Journal feature is a very powerful but often forgotten feature which can also provide powerful information management. The Journal can be set to automatically track all emails to and from any Contact in your Outlook Contacts database. The Journal will then display a complete listing of all emails sent and received without any user intervention. The same result can also be achieved by using the Activities button in the Contacts screen however this will only display details for a single contact at a time. Of course both options can be used together. The Journal can also be used to record details of phone calls or events with Contacts however this is a manual process. One of the excellent features of the Journal is the built in Timer function which allows you to click on a Start button to record the duration of a phone call, meeting or other event with a contact if you are at your computer. When finished you simply click on a Pause button to stop the Timer, complete the details section of the screen and save it. Details inlcuding time can also be manually entered after the event. Contact Activities As mentioned above this is a feature in the Contact details screen for any Contact. Simply open your Outlook Contacts and double click on a Contact name to open their details screen. On the ribbon at the top of the screen you will see a button called Activities. Click on this and Outlook will immediately collate and display details of all items recorded by or entered into Outlook for that Contact. Emails are automatically recorded however as mentioned above details of phone calls, meetings or other events with Contacts need to have been entered manually. Windows Search Windows search is a Microsoft desktop based search utility which is built into Vista but is available for Windows XP systems via a free download patch from Microsoft. It enables all documents on your computer to be indexed for faster retrieval and this includes the Search function in Outlook. You can check if Windows Search is installed on your system by going to the Control Panel and opening "Add remove Programs" and check the list for an entry called Windows Search. Make sure you exit Control Panel without changing anything though. Alternatively open Outlook and click on a mail folder, any folder will do. Near the top of the screen just under the name of the mail folder will be a search box. Click on the drop down arrow at the right end of the box. If Windows Search is installed there should be an option there called Search Desktop. This completes the summary of the Outlook tools and features that will be used. Following is the procedure to commence using them and streamline your workflow. The procedure has been set out below in detail and may seem overwhelming when reading through the detailed notes. However it is not difficult at all and should take no more than 20-30 minutes for someone familiar with the features of Outlook that are used. For someone just used to using Outlook for sending and receiving emails it will take a little longer, perhaps 45 minutes to an hour. Immediately following is a summary of the steps involved. Step 1. Review the folders set up under your Mailbox. Step 2. Set up a Send Delay rule for outgoing emails. Step 3. Set up Follow Up Search Folders. Step 4. Set up "For Reference" and "Delegated" Categories. Step 5. Download and install Windows Search if it is not already on your system. If you are using Vista it should already be installed. Step 6. Ensure all persons/businesses you communicate with by email are set up as Contacts. Step 7. Work though your Inbox and other folders containing stored mail and implement the strategy outlined above. Procedure Step 1. Review the folders you have set up in your Mailbox . If you have too many they should be condensed into main folders with sub folders under each one if necessary. As to what folders you should actually have is very much a personal choice as it will depend on your particular work situation and position and the type of business your are in. However some common main folders that may be used are listed below. Customers Employees Financial General Legal Personal Specific Suppliers Again, try to keep the number of additional folders added to no more than ten. Sub folders (folders within folders) can then be set up for specific data within the broad category of main folders. For example, under the Specific main folder you might set up folders for Project A, Matter XYZ etc. The benefit of restricting the number of main folders is that it categorises items into broad categories which can then be broken down into specific sections as sub folders. With all main folders in your Mailbox collapsed they should all display in the available Navigation pane area without having to scroll. Sub folders are then accessed by expanding the relevant main folder by clicking on the plus sign in front of its name or simply double clicking on the main folder. Step 2. Set up a Rule to delay the sending of emails by 1 minute or longer if you prefer. The procedure to do this is as follows. Click on Tools on the Main Menu toolbar. Select Rules and Alerts from the drop down menu. Click on the New Rule button at the top of the pop up box. From the Rules Wizard window go to the section headed Start from a blank rule. Click on Check messages after sending. Click on the Next button at the bottom of the window. Click on the Next button again. Click on the Yes button on the pop up message that appears. Tick the box alongside "defer delivery by a number of minutes"....the last option in the list. In the white rectangle at the bottom of the dialog box click on the hyperlink "a number of" Choose the time delay period you want and click on ok. I use 2 minutes. Click on the Next button. Click on the Next button again. Enter a name for the Rule...call it Send Deferral. Make sure the "turn on this rule" option is ticked. Click on the Finish button. Click ok on the pop up message saying that this is a client rule.... Step 3. Set up the Follow Up Search Folders as follows. Set up a Follow Up Overdue Search folder. 1. In Outlook go the the Navigation panel and ensure your Mailbox and folders under it are visible. 2. Right click on Search Folders and select the New Search Folder option. 3. In the next window scroll down to the Custom section then select the option to "Create a custom Search Folder" then click on Choose. 4. Enter the name for the folder as "1.Follow Up Overdue" without the quotes. 5. Then click on the Criteria button. 6. Click on the Advanced tab. 7. Click on the Field button then highlight the Frequently Used Fields option and make selections based on this screen image of the window you are in. 8. When you have set up the Criteria by selecting from the drop down options and your selections exactly match those in the screen image then ok out of each window. You have now set up your first Follow Up Search Folder. The other Follow Up Search folders you will now set up are done in the same way but with different criteria as follows. Set up a Follow Up Today Search folder. Follow points 1. to 3. as above 4. Enter the name for the folder as "2.Follow Up Today" without the quotes. 5. Then click on the Criteria button. 6. Click on the Advanced tab. 7. Click on the Field button then highlight the "Frequently Used Fields" option and make selections based on this screen image of the window you are in. 8. When you have set up the Criteria by selecting from the drop down options and your selections exactly match those in this screen image then ok out of each window. Set up a Follow Up Tomorrow Search folder. Follow points 1. to 3. as above 4. Enter the name for the folder as "3.Follow Up Tomorrow" without the quotes. 5. Then click on the Criteria button. 6. Click on the Advanced tab. 7. Click on the Field button then highlight the "Frequently Used Fields" option and make selections based on this screen image of the window you are in. 8. When you have set up the Criteria by selecting from the drop down options and your selections exactly match those in this screen image then ok out of each window. Set up a Follow Up Later Search folder. Follow points 1. to 3. as above 4. Enter the name for the folder as "4.Follow Up Later" without the quotes. 5. Then click on the Criteria button. 6. Click on the Advanced tab. 7. Click on the Field button then highlight the "Frequently Used Fields" option and make selections based on this screen image of the window you are in. 8. When you have set up the Criteria by selecting from the drop down options and your selections exactly match those in this screen image then ok out of each window. Set up a Follow Up Anytime Search folder. Follow points 1. to 3. as above 4. Enter the name for the folder as "5.Follow Up Anytime" without the quotes. 5. Then click on the Criteria button. 6. Click on the Advanced tab. 7. Click on the Field button then highlight the "Frequently Used Fields" option and make selections based on this screen image of the window you are in. 8. When you have set up the Criteria by selecting from the drop down options and your selections exactly match those in this screen image then ok out of each window. Set up a Follow Up Total Search folder. Follow points 1. to 3. as above 4. Enter the name for the folder as "6.Follow Up Total" without the quotes. 5. Then click on the Criteria button. 6. Click on the Advanced tab. 7. Click on the Field button then highlight the "Frequently Used Fields" option and make selections based on this screen image of the window you are in. 8. When you have set up the Criteria by selecting from the drop down options and your selections exactly match those in this screen image then ok out of each window. Set up a For Reference Search folder. This folder is set up slightly differently as it is not based on Follow Up time flags. Follow points 1. to 3. as above 4. Enter the name for the folder as "7.For Reference" without the quotes. 5. Then click on the Criteria button. 6. Click on the More Choices tab. 7. Click on the Categories button then highlight the Colour option you want then click on the Rename button on the right and rename it For Reference then place a tick in the box to the left of the colour icon and click on ok at the bottom of the window. 8. When you have finished click on ok at the bottom of each window. Set up a Delegated Search folder. Follow points 1. to 3. as immediately above for the "For Reference" folder 4. Enter the name for the folder as "8.Delegated" without the quotes. 5. Then click on the Criteria button. 6. Click on the More Choices tab. 7. Click on the Categories button then highlight the Colour option you want then click on the Rename button on the right and rename it Delegated then place a tick in the box to the left of the colour icon and click on ok at the bottom of the window. 8. When you have finished click on ok at the bottom of each window. Messages which are Categorised as Delegated should also have a Follow Up flag applied. If no date is needed then use the No Date Follow Up option. The message will show in one of the Follow Up folders numbered 1. to 5. When an email is no longer required to be Followed Up right click on the email, select Follow Up from the list of options that appears then select the Clear Flag option. Never simply delete the email from the Follow Up folder as this will delete it completely. Simply removing the Flag from the email will clear it from the Follow Up folder and leave it in its original location which should not be the Inbox! Step 4. Set up a Category named "For Reference" with the colour of your choice. I have used Blue. If you Delegate emails to other staff to handle and you wish to keep track of these you will also need to set up a "Delegated" Category so these emails can be tracked. You can use either Categories or Follow Up flags or both for tracking these. Messages are categorised by right clicking on the message then selecting the Categorise option then the relevant Category. Messages being sent can be Categorised at the time the message is being composed or afterwards however it makes more sense to do it at the time. This also applies to applying a Follow Up flag to a message. Again, when you want to clear a Categorised delegated email that has been attended to, right click on the email, select Categories from the list of options that appears then select the Clear Category option. If the email was also flagged to Follow Up then clear the Follow Up flag as described in Step 3. Never simply delete the email from the Follow Up folder as this will delete it completely. Simply removing the flag or the Category from the email will clear it from the Follow Up folder and leave it in its original location which should not be the Inbox! When you have all your Follow Up Search Folders set up go to the Navigation pane and right click on the first Follow Up Search Folder then select Properties from the pop up options and select the "Show total number of items" option. Do this for each of the new folders you have set up. This way you can see at a glance how many messages each of your folders contain. You can also do this for any folder if you like or you may prefer to leave your existing folders to show only the unread message count in brackets after the folder name. Step 5. Download and install Windows Search if you are not using Vista or it is not already installed on your system. Click on the following link to go to the Microsoft download page where you click on your version of Windows. A pop up download dialog box appears. Click on ok to download to your computer. Once the download completes locate the file on your hard drive (it will be in the folder you have nominated in your browser as the Download folder) then double click to run and install the software. Follow any prompts during the installation process. Windows Search Download Link Step 6. Ensure you have all your regular email recipients and senders set up as contacts in your Outlook. This can be done quickly for emails sent and received by finding emails to/from these parties then opening the email then right clicking on the email address contained in the email and selecting Add to Contacts. Step 7. The final step is to physically go through all emails in your Inbox one by one and if necessary apply an appropriate action for them as follows. Determine which emails require an action and which are simply to be stored for reference. Initially this should include not just your Inbox but all folders where you have previously stored email messages. This may take some time to complete and can be done over a number of sessions however it does need to be done sooner rather than later. After a Follow Up flag or Category has been applied to messages in your Inbox drag the messages to appropriate folders for storage. Messages still in your Inbox that do not need to be flagged for Follow Up or Reference should be moved to an appropriate storage folder. Multiple messages can be selected and dragged in one operation if they are to go to the same folder. After clearing your Inbox in this way do the same for any messages in other folders that have not yet been reviewed for either Follow Up action or for Categorising. Once set up this system is a cinch to use. The trick is to follow the procedure to classify all emails arriving in your Inbox on a daily basis and you will have an Outlook system that you will be fully in control of not one that controls you. This will require some initial effort until it automatically becomes part of your normal daily routine. This can take anywhere from a few days to a few weeks. The above also applies to messages that you send as well as to messages in your Inbox. When composing a message you can flag and/or categorise the message before sending it however the message will still live in your Sent folder after it has been sent unless you have a Rule set up to automatically mow it to a certain folder based on certain criteria or as part of your new daily email routine you have physically dragged it to a storage folder of your choice. No matter where you decide to store messages in Outlook the Search feature if used correctly will find them. As mentioned above the Activities feature in your Contacts screen will enable you to quickly collate all messages to or from a certain Contact by opening Outlook Contacts then double clicking on the chosen Contact then clicking on the Activities button in the Ribbon at the top of the screen. This will produce a screen display of all items Outlook has recorded against that Contact. If you are the type who likes to have all your mail in the one place you can set up another Search Folder called All Mail as follows. Set up an All Mail Search folder. Follow points 1. to 3. as above 4. Enter the name for the folder as "All Mail" without the quotes. 5. Then click on the Criteria button. 6. Click on the Advanced tab. 7. Click on the Field button then highlight the "Frequently Used Fields" option and select the Received option. 8. Click on the Add to List button. 9. Click on the Field button then highlight the "Frequently Used Fields" option and select the Sent option. 10. Click on the Add to List button. 11. Then click on the ok button to exit out of each window. You now have all your mail whether Sent or Received in one folder. This does not actually duplicate your existing messages. What you have done is simply automated a Search feature of Outlook that will continually monitor your mail and place it in this Search folder if the folder search criteria are met. This also applies to the other Search folders that you created in the above process. Again, please remember, DO NOT delete messages in any search folder unless you are sure that is what you want to do as as that will delete the original message. Either remove the Message Flag or Category for each message in the Search folder. Also DO NOT change any of the criteria for the Search folders created above. This image shows how my Outlook 2007 Navigation panel looks. Using the Outlook Journal to record phone calls etc with Contacts. When you phone a Contact or a Contact phones you or you receive a visit from a Contact you can record the time spent with the Contact as follows. Open Outlook Contacts Right click on the Contact name Select the option Create Select the option New Journal Entry for Contact Click on the Start Timer button in the Toolbar when you are ready to start recording. At the end of the phone call or meeting click on the Pause Timer button. Complete the details of the phone call or meeting with as much or as little details as you want. Click on the Save and Close button in the Toolbar. To view the Journal there should be a Journal icon at the bottom of the Navigation panel in Outlook. If it is not there click on the small drop down arrow at the very end of the icon bar at the bottom of the Navigation Panel (not the shortcut arrow), select Add or Remove Buttons then select Journal and a small green icon should appear. Over time you will find this an invaluable reference for details recorded for a particular Contact. The above procedure makes use of some of the more useful features of Outlook and whilst it is not at an advanced level it is enough to provide simple and effective email, task, appointment and information management for anyone prepared to follow the methodology which is pretty straight forward. Whilst Outlook has its own Task Manager you can actually send yourself to do/follow up emails and reference them in the manner outlined here so that they too become integrated into this method of email/task management. The above procedure is not complicated however it is well worth the time and effort to implement. Anyone familiar with the features of Outlook used in the above procedures should be able to set up Outlook this way in 20-30 minutes. Of course it will then be up to the user to start Flagging, Categorising and moving emails already in your system. If you need assistance please do not hesitate to email me. Rules in Outlook will be explored at another time.
Site Design & Content Copyright © Peter J
Wills 2008-2009 All Rights Reserved
Last Updated 2 March 2009
|